Kids Movies Selection
Coding Challenge :: Movie App using a film database
Problem Statement: Create a movie App using a public film database
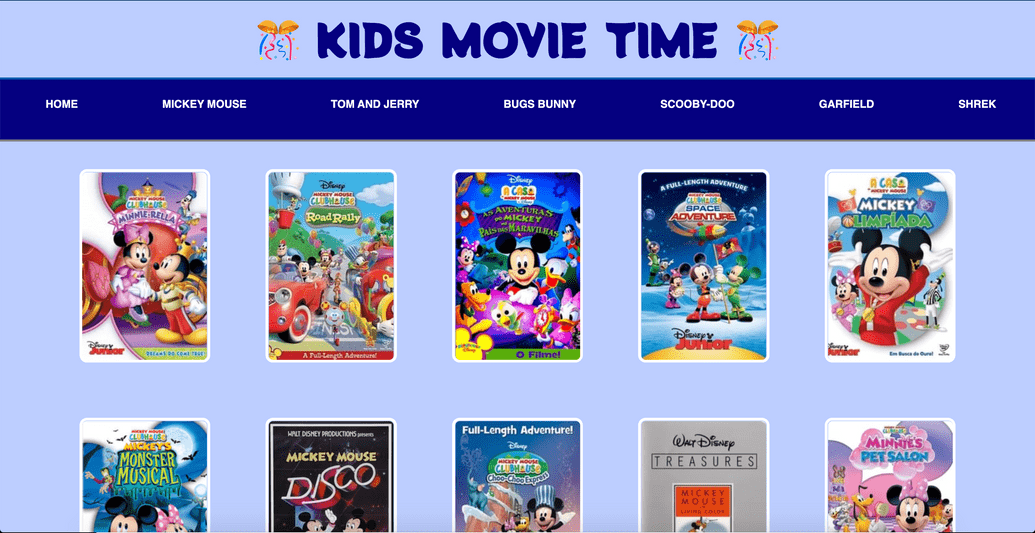
Create a Dashboard for your favourite films. Each film should be displayed in a box of its own with an image of the film, similar to how it would look on Netflix.
Github Repo for the App & Live Demo
Here's the final version of my app
Learning Targets:
As part of this coding challenge, I practised below skills:
- Styling using Flexbox
- CSS Animations (use of transition)
- How to use a public database
- Dynamically generate html page content
- Adding interactivity using Javascript
Action Plan:
- Determine input & output fields
- Define folder struture & create necessary files
- Add content to the html page
- Add dynamic content to the html page using JavaScript
- Add styling using CSS
- Publish the app.
Plan Execution
- Determine input & output fields
Let's determine input and output values for our movie app
- Input Fields
- User selection of movie categories from the menu bar
- Output Fileds
- Based on user selection, a search performed against themoviedb
- Define folder struture Use a code editor (recommended: VS Code) to create a basic folder structure and files.
Folder: Movie App:
|__ index.html|__ index.js|__ css -> style.css|__ images -> to hold the images
Add html content to the page
Create basic structure of the html page. Add a header, menu, main content & footer sections.
<!DOCTYPE html><html lang="en"><head><meta charset="UTF-8" /><meta name="viewport" content="width=device-width, initial-scale=1.0" /><title>Kids Movie Time</title><link rel="preconnect" href="https://fonts.gstatic.com" /><link href="https://fonts.googleapis.com/css2?family=Potta+One&display=swap" rel="stylesheet" /><link rel="stylesheet" href="./css/style.css" /></head><body><header><div class="title-wrapper"><h1 class="title">🎊 Kids Movie Time 🎊</h1></div></header><main><div class="menu"><div class="menu-item"><a href="#" class="menu-link">Home</a></div><div class="menu-item"><a href="#" class="menu-link">Mickey Mouse</a></div><div class="menu-item"><a href="#" class="menu-link">Tom and Jerry</a></div><div class="menu-item"><a href="#" class="menu-link">Bugs Bunny</a></div><div class="menu-item"><a href="#" class="menu-link">Scooby-Doo</a></div><div class="menu-item"><a href="#" class="menu-link">Garfield</a></div><div class="menu-item"><a href="#" class="menu-link">Shrek</a></div></div><div id="img-banner-container"><img id="img-banner" src="images/theater-blue.jpg" class="image" /><div class="banner-main-text"><h3>The Best Kid Movies of All Time</h3><p class="banner-sub-text">Snuggle up together on the couch & enjoy</p></div></div><div id="movie-container"></div></main><footer><span class="moviedb-attribution">Site created by Ambreen Khan using </span><a href="https://www.themoviedb.org/"><img class="moviedb" src="images/tmdb.svg"/></a></footer><script src="index.js"></script></body></html>
- Create dynamic content using JavaScript. Perform these steps while adding interactivity to the html page:
- Link
jsfile withhtmlfile. - Grab elements from html & read values for the menu selection by user
- Add event listenrs for menu clicks to get movie data and dispaly results based on the selected menu item.
Here's what my JS looks like:
let menuLinks = document.getElementsByClassName('menu-link');let imageBanner = document.getElementById('img-banner-container');let movieContainer = document.getElementById('movie-container');let apiKey = 'YOUR_API_KEY';for (let i = 0; i < menuLinks.length; i++) {menuLinks[i].addEventListener('click', function() {let menu = menuLinks[i].textContent;if (menu !== 'Home') {imageBanner.style.display = 'none';movieContainer.style.display = 'block';getMovies(menu);} else {imageBanner.style.display = 'block';movieContainer.style.display = 'none';}});}function displayMovies(results) {let movieHTML = results.map(result => {if (result.poster_path) {let posterPath = `https://image.tmdb.org/t/p/w185_and_h278_bestv2/${result.poster_path}`;return `<div class="movie-card"><img class="movie-img" src="${posterPath}" /></div>`;}}).join('');movieContainer.innerHTML = ``;}async function getMovies(menu) {let query = menu;const url = `https://api.themoviedb.org/3/search/movie?api_key=${apiKey}&language=en-US&query=${query}&page=1&include_adult=false`;let response = await fetch(url);let data = await response.json();displayMovies(data.results);}
- Add styling using CSS
- Style header, menu, page content & footer.
Here's what my styling looks like:
body {margin: 0;padding: 0;background-color: navy;}.title-wrapper {margin: 0;background: #bdceff;border-bottom: 3px solid #005aad;padding: 10px;}.title {margin: 0;width: 100%;font-weight: 800;font-family: 'Potta One', cursive;color: navy;text-transform: uppercase;font-size: 4em;text-align: center;}.title:hover {color: #1f93ff;}.menu {margin: 0;width: 100%;display: flex;padding: 5px;background-color: navy;min-height: 10vh;flex-direction: row;justify-content: space-around;align-content: center;border-bottom: 3px solid gray;flex-wrap: wrap;transition: all 1s ease-out 0s;}.menu-link {text-decoration: none;font-size: 1em;text-transform: uppercase;font-weight: 800;font-family: Roboto, sans-serif;color: white;}.menu-link:hover {font-size: 1.5em;color: #1f93ff;}.menu-item {height: 2em;align-self: center;margin: 5px;}#img-banner-container {position: relative;text-align: center;color: white;}#img-banner {width: 100%;}.banner-main-text {position: absolute;font-size: 30px;top: 30%;left: 50%;transform: translate(-50%, -50%);}.banner-sub-text {font-size: 40px;color: orange;}.movie-card {display: flex;padding: 25px;}.movie-img {border: 0.3rem solid white;border-radius: 0.7rem;margin: 1rem;}.movies {background-color: #bdceff;;display: flex;flex-wrap: wrap;align-items: flex-start;align-content: center;justify-content: center;box-sizing: border-box;}footer {text-align: center;}.moviedb {height: 10%;width: 10%;}.moviedb-attribution {color: #01b4e4;}
- Publish the app
I used netlify to deploy my app by following these steps:
- Created a repository on github.
- Pushed the app code.
- Deploy the site using your netlify account (you need to create an account if you don't have one already). You'll have to give netlify an access to the app github repo. The html file with the name index.html is published as the home page.
